BUSKITS KIT 13 - HIGHBRIDGE BRISTOL K (E.C.W) 1948

Review by Alan Purssey
THE VEHICLE
The programme for restoration of services
after the second world war for London Transport was completed in 1946. Passengers were
up on pre-war figures, and the lack of new vehicles and the availability
of time-expired vehicles called for drastic action to cut passenger
queues. A short-term measure was to hire coaches from independent
operators. The flow of the new RT buses was slow partly due to
Government restrictions. Alongside the utility buses appearing on
London streets were buses destined for the Tilling group. 25 per cent
were diverted to
London
to ease the situation.
Many of these buses were of the new Bristol K type with Eastern
Coach Works bodies,
Bristol
had a long association with this company. Eastern National, Bristol
Tramways and Brighton and Hove were among the operators to lose their
new vehicles to London Transport.
These buses were delivered in their respective company colours but did
not carry any company fleet names - these would have been added by the
companies themselves. Before entering service they were sent to Chiswick
to have a specially made metal bull’s eye attached to the radiator
together with metal garage and running number brackets fitted to the
body sides in accordance with LT practice. The London Transport name
flanked by two bull eyes was carried in the upper destination aperture.
The larger destination aperture carried a restricted blind usually the
route number and destination only to inform the public that they were in
service. Tottenham Garage (AR) was allocated seven from a batch of ten
destined for Brighton & Hove registered EAP8-11 and EPM1-3. These attractive red and
cream finished vehicles fitted in well with the similar red London
types. They were employed on routes 73 and 76.
THE
KIT
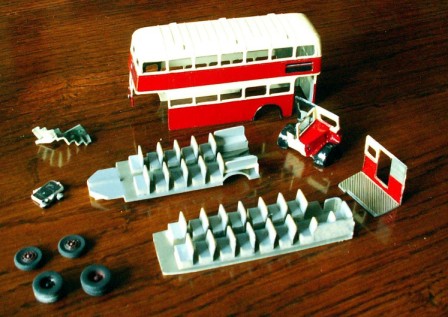
This is a model from Alan Johnson, my first
from his range, and is made up of 23 parts (see picture to left) the
main body part is one item. The front bulkhead, nearside cab, bonnet and
wing form the next largest unit, the staircase and rear bulkhead are two
further items, the upper deck flooring with seating with the nearside
seating a separate item to allow the modeller to chose the seating capacity,
usually 56, These are then glued in place 1mm from the edge to allow for
the glazing. The chassis flooring has fixed seats plus two bench seats
as separate items, complete the resin parts. The wheels, radiator with
headlights attached, axle retainers, guard rails, and steering wheel
come in cast metal. All the glazing has the sliding vents printed on, is
fitted from the inside apart from the driver’s windscreen which is
fitted to the outside, one small piece of glazing is provided for the
side cab window. Painting is recommended after cleaning up of the body
parts and due to the clever design of this kit makes that task much
easier for the modeller.
After painting, cut the glazing carefully around the guidelines. I
fitted the upper front window first and butted the side windows up to
the front to help hold the front window in place. Once the glazing was
completed a start can be made on the final assembly (picture below left). The upper floor
unit is glued in place making sure the unit is butted up to the front
bulkhead. Then the lower rear bulkhead containing the platform, with the
stairs fitted in place last; the front unit I left to last. The remaining
cast parts can then be glued in place not forgetting the stanchion pole
supplied in the kit through the hole in the platform. You will need a
piece of wire for the two grab handles, apart from some slight
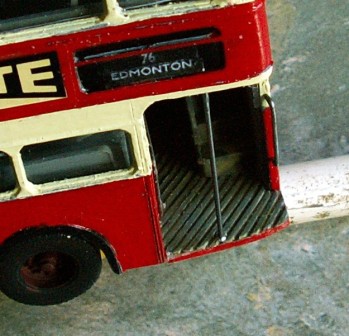
adjustments it went together like a dream. The resin body is rather
fragile and needs careful handling; but this is advantageous when it comes
to assembling the interior parts. Typical of the high attention to
detail in this model is the platform slats (picture below centre). The
instruction sheet is very clear and precise: do follow the sequence. Alan has included a history of these vehicles
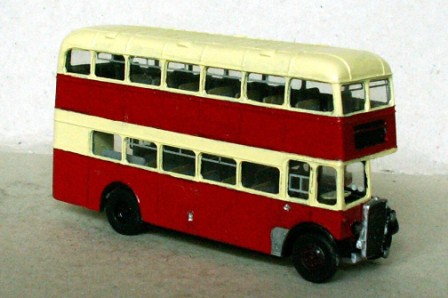
stating some of the many
operators who used them. The picture below right shows the assembled
model ready for the transfer application.
The Bristol K was very popular with
the Tilling Group companies and therefore found its way into the fleets
of many
provincial operators and as these buses were to find their way to
London
should appeal to
London
collectors who wish to add a touch of variety to their collections.
NOTE As the Brighton & Hove buses allocated to Tottenham did not have the louvers on
the bonnet sides they need careful removal with a file. This is one of
the easiest models I have tackled in a long time and I can thoroughly
recommend this kit to anyone who has not dared tackle a double deck
model before.
FINISHING TOUCHES


To finish the model period posters were from the
Fox range, together with the small metal bull’s eyes for the radiator,
the flanked London Transport and bulls eyes came with another restricted
blind from Fox (this does not show in the photos,), windscreen wiper and
Garage codes for Tottenham from the MBC range and the restricted blind
for route 76 was from the Trysco range. The number plates I made on my
PC. Rear view mirrors from
Mark Hughes.
Alan Purssey